The Ultimate Guide to ScheduleOnce
Learn about one of the more popular time management services available: ScheduleOnce (a product of OnceHub). We’ll explore the service’s product offerings, give a basic how-to, and look at pricing.

There’s no shortage of scheduling tools these days. So many options in fact that it may be difficult to choose one that works for you.
In this guide, we explain the ins and outs of one of the more popular time management services available: ScheduleOnce (a product of OnceHub). We’ll explore the service’s product offerings, give a basic how-to, and look at pricing.
Want to make the most informed decision about which calendar app to use? Keep reading.
What is ScheduleOnce?
ScheduleOnce strives to take the back and forth out of shared scheduling. More specifically, ScheduleOnce focuses on helping brands easily connect customers and leads. The company leans heavily into lead engagement and acceleration.
The platform allows business owners and managers to set up an organization’s scheduling scenarios. Once approved, they can publish and share scenarios via email, on the company’s website, or through social media. Clients and prospective clients can book a time that works for them, and both parties’ calendars will be updated in real-time.
ScheduleOnce pricing
OnceHub offers four products: ScheduleOnce, ChatOnce, FormOnce, SubmitOnce. For our purposes, we’ll stick to ScheduleOnce pricing.
ScheduleOnce has three plan options: one free, two paid. Here’s an overview of what you’ll get with each plan:
Starter
Free for up to three users.
You get unlimited meetings, unlimited event types, one-on-one and group meetings, calendar integrations, video conferencing integrations, workflow integrations, and more.
Growth
$10 per user/month.
The Growth plan builds on ScheduleOnce’s (rather robust) free plan. You also get white-label branding, advanced integrations, APIs and webhooks, unlimited reporting, single sign-on (SSO), 24/7 email support, and 24/7 live chat support.
Enterprise
Custom pricing.
Enterprise clients get everything in the Growth plan plus compliance services, professional services, onboarding assistance, organizational security, and 24/7 premium support.
How to set up ScheduleOnce
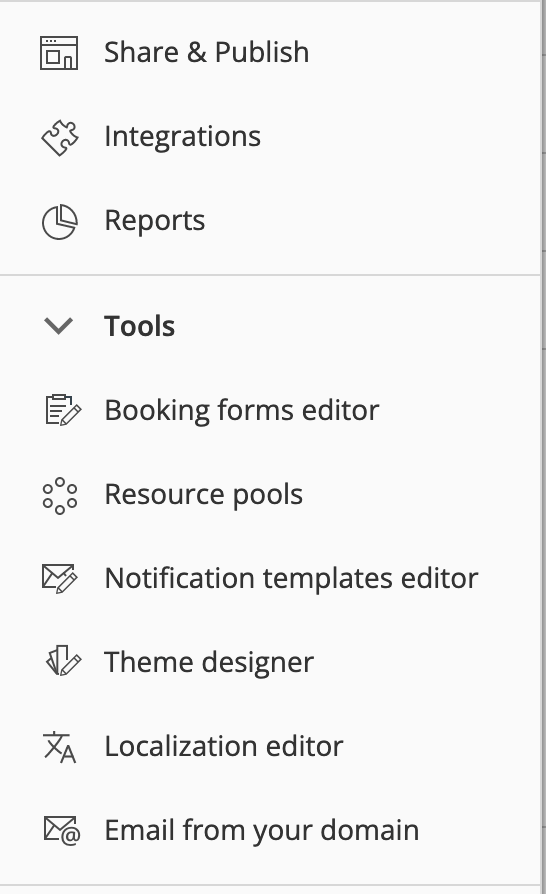
After you create your account, you might want to explore the platform a little bit before you set up your first event. On the left, you’ll see a bar that contains a number of icons. When you place your cursor over it, the bar will open up into multiple sections.
From the main page (that you’re on now) you can create Event Types, Booking Pages and Master Pages.

The second important section lets you view and access “Integrations.” You’ll need this section when you want to automate and update your calendars with ScheduleOnce.
The third, “Tools,” is where you’ll find the tools you need to send customized information to people in your bookings.
Once you familiarize yourself with ScheduleOnce’s platform, exit the menu and focus on the page’s core content.
On the left side of the page, you’ll find all the information you need to create and manage “Event Types.” The center section is reserved for “Booking” pages and the right is for creating and managing “Master” pages.
Event Types
What sets ScheduleOnce apart from other time management tools is the ability for users to schedule meetings and events by “Type.” By categorizing events, you can manage how many of what type of meetings you’re willing to accept during any given time period and how many.
For instance, say you only want to accept 20 new client consultations a week. You can create the event type “New Client Consultations” and then set when you’re willing to accept these types of meetings, where and for how long. You can all set meeting prices and create options for cancellation or postponement.
[Learn more! Read about meeting etiquette and how to host better Zoom meetings.]
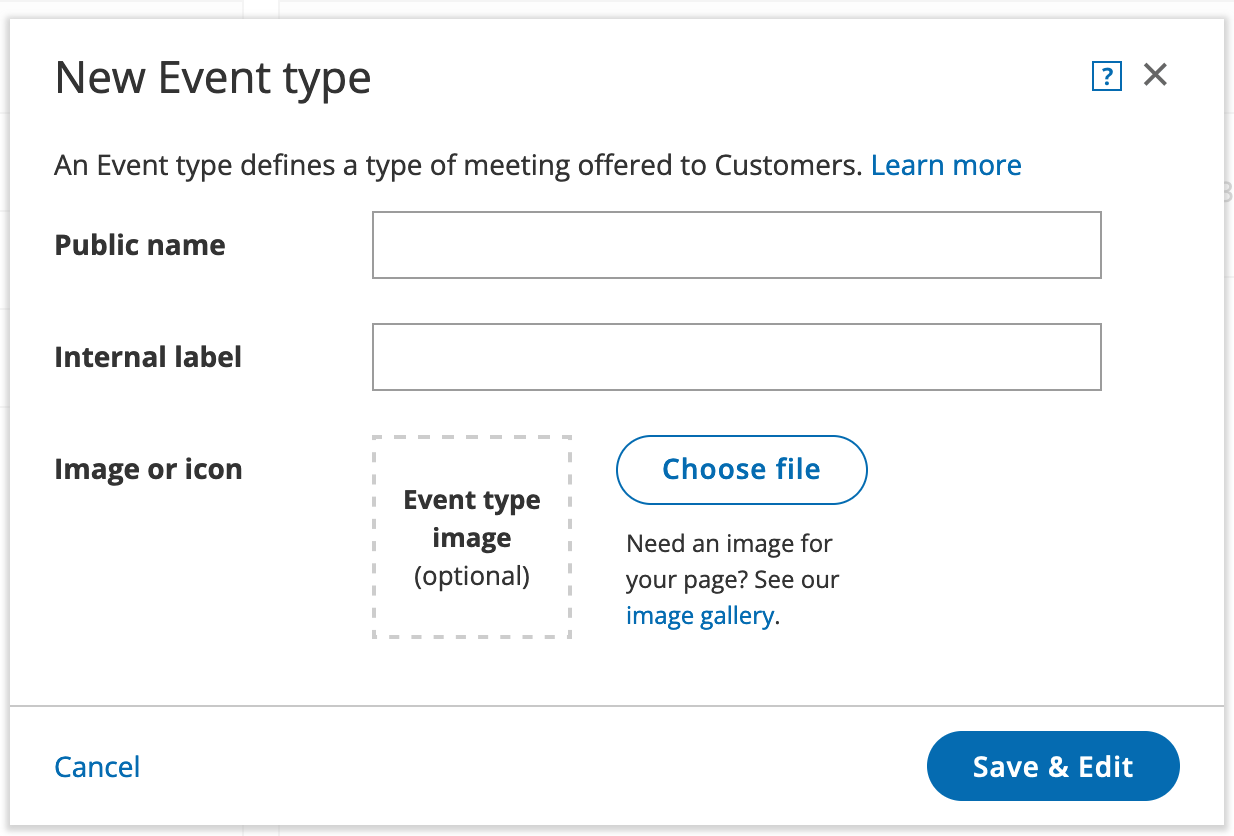
Once you set an Event Type, you can determine duration.
ScheduleOnce has three preset event durations: 15-minutes, 30-minutes, and 60-minutes. However, you can customize the duration. You can also give the event a “Public Name” and assign an icon to it. These customization options allow you to easily associate a booking with traits such as type, price, mode of booking, and category.
Hitting “Save and Edit” will bring you to another page where you can finally start defining the elements of an event. ScheduleOnce offers numerous customization options, including Time Slot settings, Overview, Customer Notifications, Payment, Cancel/Reschedule Policy, Scheduling Options, and Time Zone Conversion.
Booking Pages
Setting Event Types is only a fraction of what ScheduleOnce can do. The Booking Pages are how you present your availability to customers or, in select cases, employees.
The Booking Page also contains all the specifications you set for the meeting, including payment terms and conditions. These pages have their own URLs so customers can easily access them, as well as CTAs, and social media buttons.
You can create several types of Booking Pages for different types of customers.
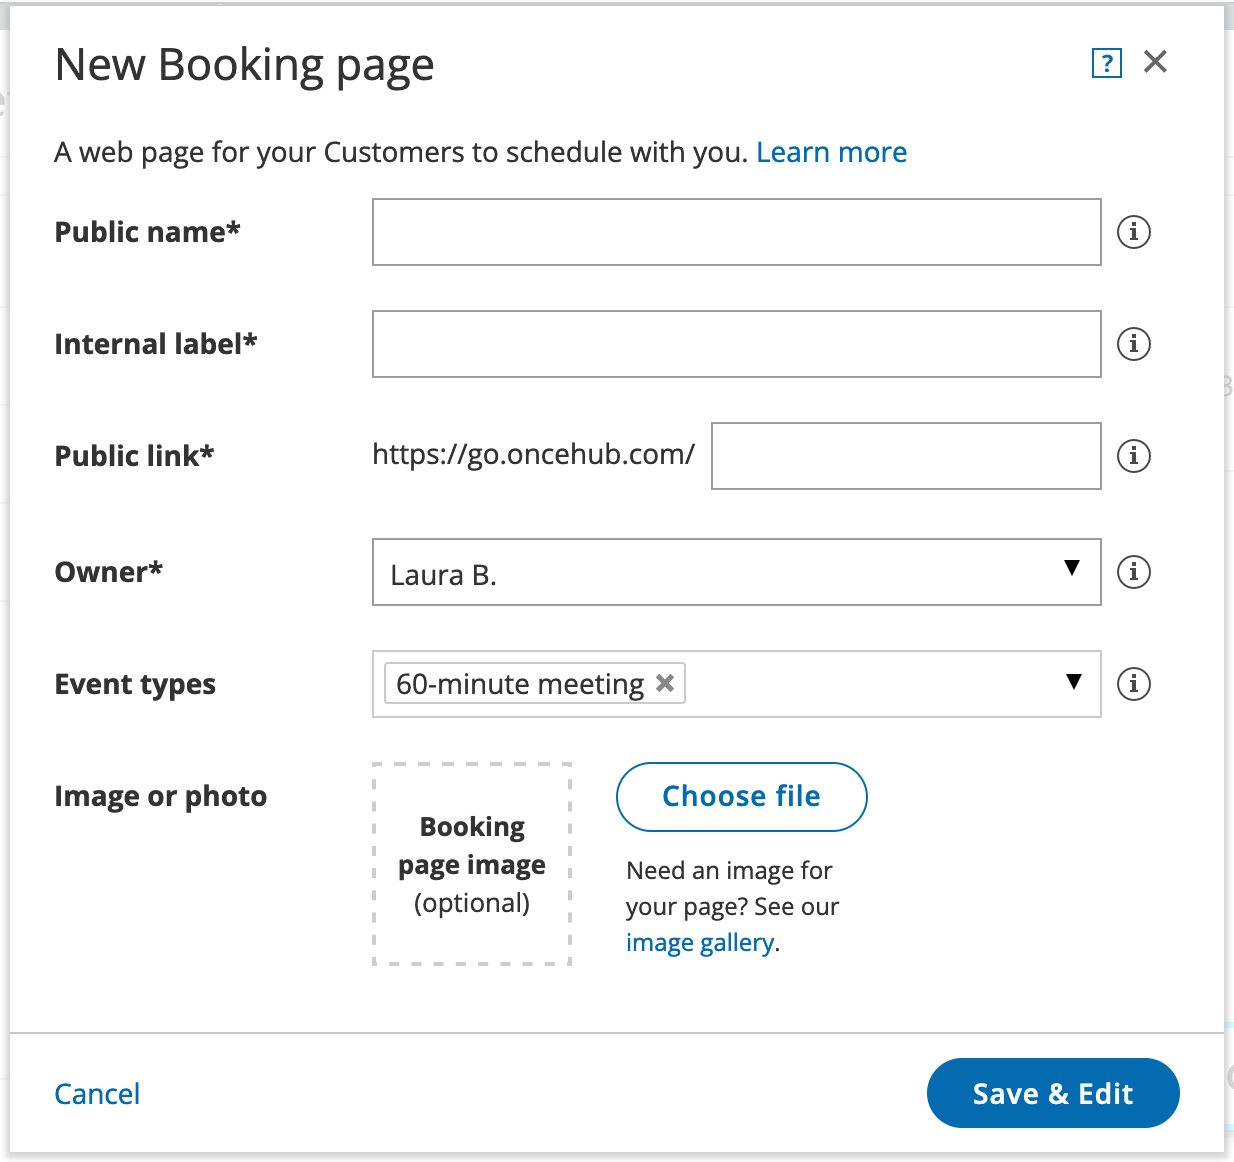
To create a Booking Page, you will need to fill out:
- The public name of the page
- The label you created for internal purposes
- The slug after the slash in the URL
- A picture you associate with the type of booking
On the booking page, you can also set recurring availability, date-specific availability, and location settings.
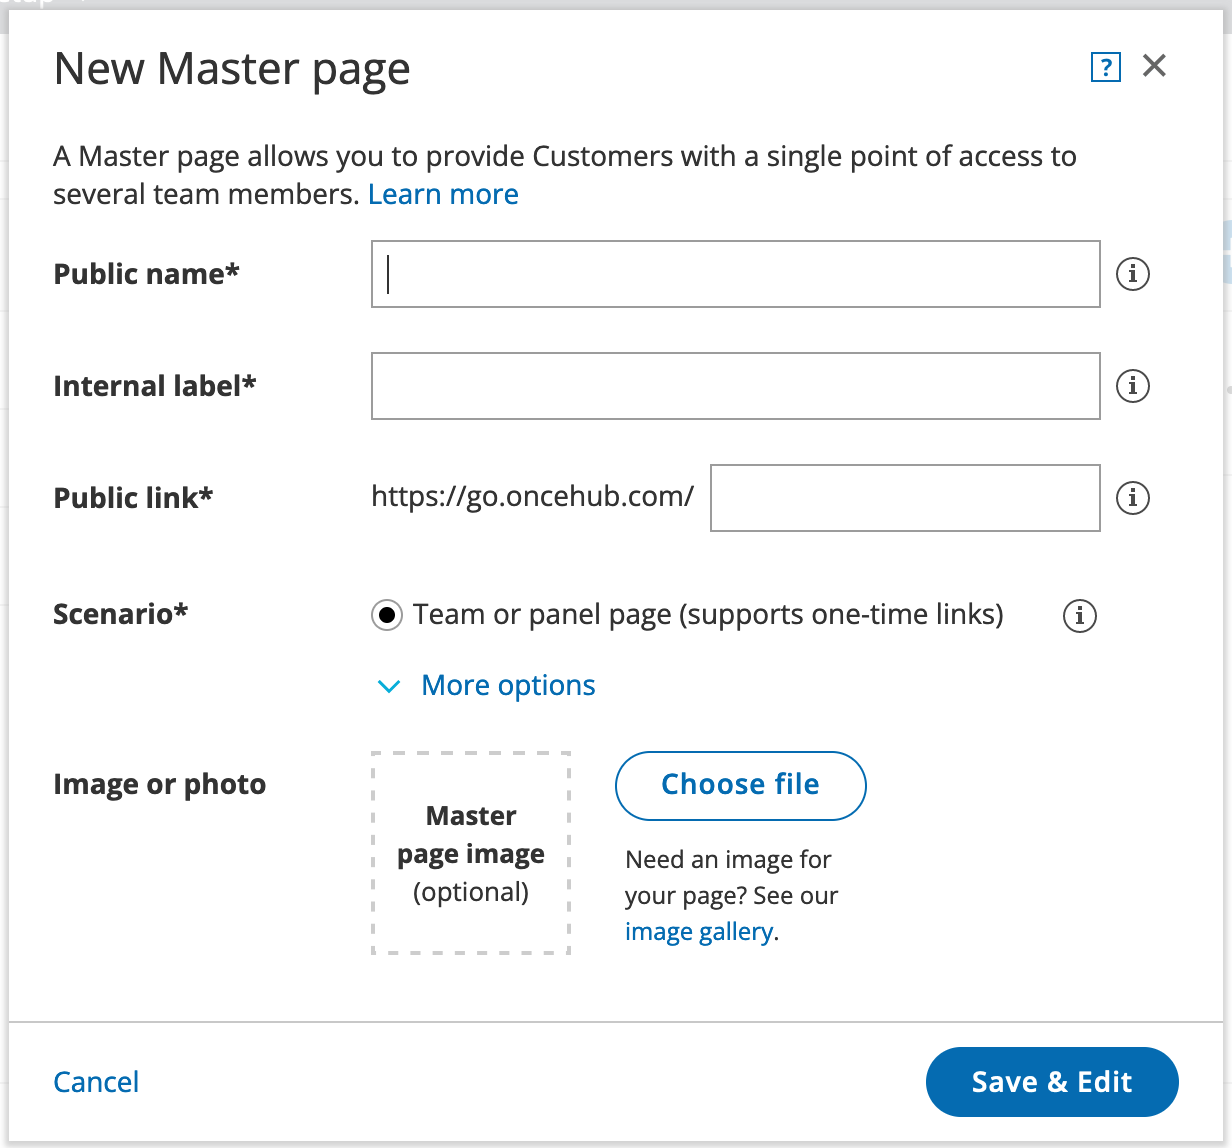
Master Pages
Master Pages provide a way for you to present multiple bookings to multiple people. Various types of businesses can benefit from the Master Pages. However, Master Pages are not set up by default, so you will need to create one yourself.
Advanced ScheduleOnce functionality
ScheduleOnce is a comprehensive time management app that boasts advanced integrations and features. From multi-user support to custom themes, there is no shortage of what you can do with ScheduleOnce. For brevity’s sake, we’re going to focus on three of the more popular and highly utilized functionalities:
Pooled Availability
Do you have multiple employees who are available to collaborate with clients and potential customers? Use pooled availability to combine the availability of multiple team members and display it to customers as a single booking calendar.
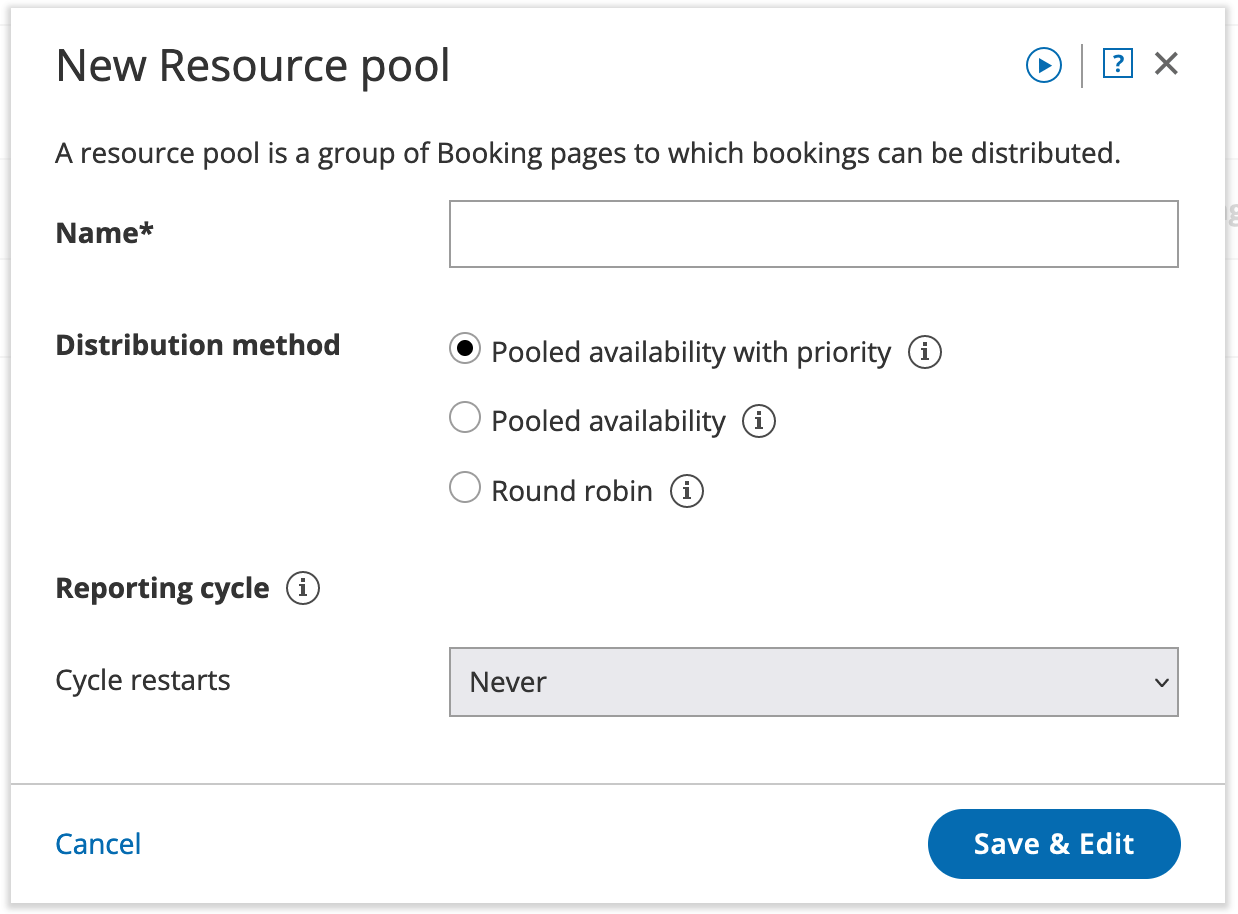
When customers select a date, time and meeting duration, ScheduleOnce will automatically assign the booking to the team member with the most available time.
Time and Workload Management
From establishing workload rules to limiting the maximum number of available time slots for any given event in any given period, you can make the most of your time with this feature.
Booking Reassignment
When one team member suddenly becomes unavailable, ensure your customer still has a great experience by automatically reassigning the booking to another appropriate and available team member.
ScheduleOnce’s numerous capabilities might be overwhelming for some, which is why you should take advantage of the free plan before you invest in a monthly plan.
How to log in to ScheduleOnce
Signing up for ScheduleOnce is simple. To create your account, you’ll be asked to enter your name, email address, and password. The site also asks that you verify your password before signing up.

Once you click “Sign Up,” you’ll be asked to verify your time zone. Don’t skip this step, as the tool may assume you’re in an entirely different time zone, which could jumble your scheduling efforts. If you have a remote team, you’ll also want to verify the time zones of your various team members.

Once you set your time zones, ScheduleOnce will give you a brief tour of the app and ask you to connect your preferred calendar. The tool allows you to connect a number of different calendar apps, including Office 365, Google Calendar, Outlook Calendar, and Apple Calendar.
Although you don’t have to connect to a calendar app right away, integrating with your preferred calendar early on can save you significant time, as ScheduleOnce checks your calendars in real-time and updates your ScheduleOnce calendar accordingly.

You’ll also have the option to schedule a test booking.

After the registration process is complete, ScheduleOnce will send you an email that contains a personalized sign-in ID and a link to your booking page. You’ll want to jot this down, as this is the link you’ll give to others to book appointments.
Once your account is set up, logging into the app is easy.
Enter your email and selected password or sign into G Suite. If you’re already signed into G Suite, ScheduleOnce should automatically log you in.
Experience simpler scheduling with SavvyCal
With a beautiful, easy-to-use interface, SavvyCal allows you to overlay calendars, offer multiple meeting durations with one link, cap meeting frequency, and more. Plus, SavvyCal integrates with other tools you’re probably already using.
It’s a no-fuss scheduling tool. Try it for yourself.